


To create your first chatbot, we’ll use Google’s new Dialogflow toolset. It harnesses powerful machine learning as well as speech-to-text. It can be incorporated right into your website as a widget or customised to your needs.
01. Create an account
Go to dialogflow.com and create your account. Sign in and agree to the permissions to enable Dialogflow to have access to your account.02. Create an agent
Dialogflow uses the term ‘agent’ to represent instances of your AI. Think of the agent as the virtual intelligence you are creating. You could have many agents working for you, each with its own personality and purpose.Click on the ‘Create Agent’ button and enter a name for your agent: ‘HAL 9000’.
03. Create an intent
First, you need to create an Intent. We are defining the ‘intention’ of the user’s inputs. Click ‘Create Intent’ and name it ‘open doors’. Press ‘Save’.04. Train the AI for this intent
Train the AI for this intent by providing phrases that a user might use. The NLP AI will use these and derived variations to train the agent. Add the following training phrases in the ‘Training phrases’ window and add as many of your own as you like:
- ‘Open the Pod bay doors, Hal.’
- ‘Open the doors.’
- ‘Let me in, Hal!’
05. Add responses
Next, you need to add some responses that the agent will respond with. You enter these in the ‘Responses’ window. Try out some like this:- ‘I’m afraid I can’t do that, Dave.’
- ‘I can’t do that right now.’
06. Test out the chatbot
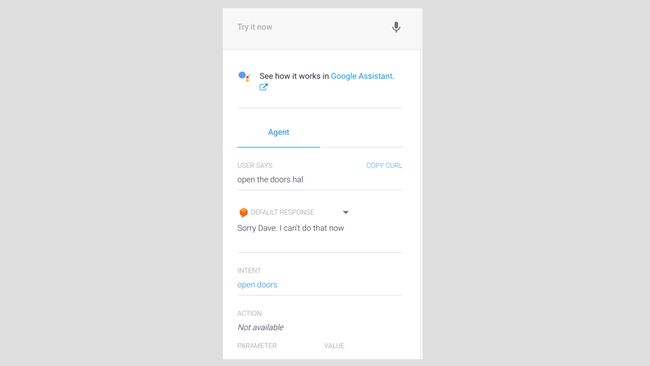
On the right-hand side of the screen is a testing tool. The chatbot will use Google’s speech-to-text service to translate your voice into text if you try that out. You should see the results of your request and the response the AI agent selected. Very cool!07. Create and use an entity
Entities are concepts that can be defined and reused in the agent’s responses as variables. Let’s train the AI to understand when a user is expressing an emotion then use that in its response to the user.On the left-hand menu, click ‘Entities’. Type ‘emotion’ for the name of your new entity. Keep ‘Define synonyms’ checked. Click in the table below and type ‘angry’ as the first emotion. Then click to the right of that and add synonyms such as ‘mad’, ‘upset’, and so on. Then add another entry for ‘scared’ and use synonyms ‘afraid,’ ‘terrified’, etc., that you like. Press ‘Save’ when done.
This has now trained the Agent to understand that ‘angry’ and ‘scared’ are emotions a user may communicate. All those synonyms are variations that might occur. The AI will generate some as well.
08. Create a new intent
Now we are going to create a new intent to use the ‘emotion’ entity we have created. Call this intent ‘emotions’ and click ‘Save’.Next add new training phrases such as ‘you’re scaring me’, ‘you’re making me mad’, and ‘I’m very angry,’ using variations of angry and scared keywords. This will train the agent to understand the various ways that a user may phrase this emotional statement.
You’ll notice the system highlights the scared and angry words for you. It’s already flagging these as entities. It has also added an entry into the ‘Actions and parameters’ window. This enables you to use these entities in your responses, too.
09. Add a response using the new ‘emotion’ entity
In the Responses window, add new responses that use this new entity. Note the ‘$’ to denote the ‘$emotion’ Entity. Try adding these responses:- ‘I am sorry you are feeling $emotion, Dave.’
- ‘Feeling $emotion is a human response, Dave.’
10. Test your chatbot again
Try saying or typing the following phrases in the testing tool.- ‘You’re making me very angry Hal.’
- ‘You’re freaking me out.‘
Feel free to play around with this as well as add some more intents and responses that you like and then we’ll add this to a web page.


No comments:
Post a Comment