

And it costs much more money, time and resources than it does to conduct some simple user testing that can help prove (or disprove) the theories we hold.

Following assumptions often result in at least one of the following outcomes:
In this article we’ll self-service our own user tests using UserLook – this is where, after defining the questions that we’d like to ask, we send the user a link where they can conduct their user test remotely in their own time. This helps us automate user testing (which saves time), while sourcing user testers from our own user-base (which saves money).
The majority of the time, teams throw in the towel with user testing because they don’t understand why they’re doing it and therefore ask all the wrong questions, which results in vague answers that don’t offer much insight. Before asking questions in a user test, we first need to ask ourselves ‘Why are we doing this?’ and ‘What do we want to learn from this user test?’
Before we begin, we first need to consider whether we’re testing an MVP (a minimum viable product) – for which user testing is the right approach – or the usability of an already validated product, in which case usability testing is the right approach. If you’re testing an MVP, then you’re probably best off focusing on user testing.
When it comes to user testing the core question is: ‘Does this solve the problem?’ However, with usability testing, the defining question is: ‘How well does it solve the problem?’
User testing comes first and this happens as soon as we have an MVP. Usability testing happens once the core product has been validated and it’s time to flesh out the wider scope of functionality that the app or website is supposed to offer. To summarise:
In this step we’ll set up UserLook and define our question set, discussing test length, compensation and more along the way.
Start by signing up to UserLook, then choose:
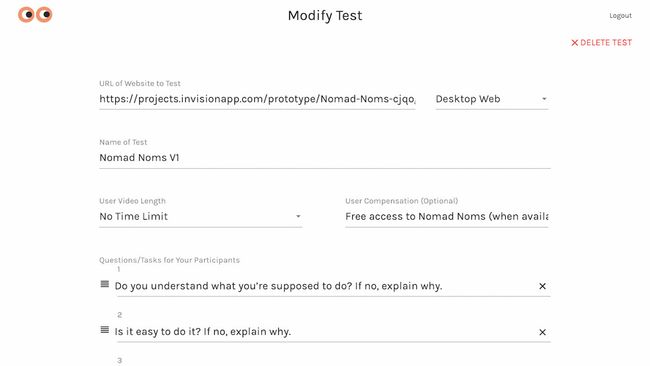
Some of the form fields are fairly self-explanatory (for example Name of Test) but we’ll run through some of the less-obvious options that can impact the outcome of our tests.
To make this work, simply sync your design to Sketch Cloud, InVision or whatever the equivalent is in your design tool of choice, then paste the given share link into the form field.
You’re probably wondering why you would want to set a time limit on your user test. Here’s one example: the five-second user test. In this day and age, where users are typically impatient, forgetful and easily distracted, a five-second user test can reveal what the user really remembers about what they just saw.
Was it immediately clear what the webpage was about? If the answer is no, then the user is likely to hit the back button. A five-second user test can determine whether or not the screen or webpage clearly communicates what the user needs to do.
For instance, an initial free exploration test might reveal that users have trouble signing up, so after designing another iteration one of the questions in a follow-up performance test could be: ‘What frustrations did you have signing up?’
For example, 18- to 29-year-olds and 48- to 59-year-olds will naturally have different needs and objectives when using, say, Facebook – where younger users might want to engage with brands and older demographics might want to stay in touch with friends. Although optional, this data can offer more context to the user feedback and contribute to the development of these personas.
If the test questions have been defined correctly, we should have some high-quality feedback that’s both actionable and consistent; this means it’s clear what we need to change in the next iteration, with some feedback recurring more than others.
Next, it’s simply a case of organizing the feedback.
- Designing the wrong thing first
- Not designing the right thing at all
- Designing the right thing but doing it in the wrong way
What exactly is user testing?
User testing is where users actually use an app or website (or, at the very least, a prototype of it) and offer feedback and insight that can be used to improve it. User testing goes above and beyond a simple feedback survey and involves watching actual users (or the target market) as they test our design.In this article we’ll self-service our own user tests using UserLook – this is where, after defining the questions that we’d like to ask, we send the user a link where they can conduct their user test remotely in their own time. This helps us automate user testing (which saves time), while sourcing user testers from our own user-base (which saves money).
Note: If you’d rather have UserLook recruit testers for you, that’s fine too – the pricing page lists various options.
When to user test
You might be wondering how often you should run user tests. The short answer is: constantly – always be user testing. When decisions are fuelled by what users are outright asking for, you’ll feel way less anxious and far more confident of success when the product you’re designing finally becomes publicly available.The majority of the time, teams throw in the towel with user testing because they don’t understand why they’re doing it and therefore ask all the wrong questions, which results in vague answers that don’t offer much insight. Before asking questions in a user test, we first need to ask ourselves ‘Why are we doing this?’ and ‘What do we want to learn from this user test?’
Before we begin, we first need to consider whether we’re testing an MVP (a minimum viable product) – for which user testing is the right approach – or the usability of an already validated product, in which case usability testing is the right approach. If you’re testing an MVP, then you’re probably best off focusing on user testing.
When it comes to user testing the core question is: ‘Does this solve the problem?’ However, with usability testing, the defining question is: ‘How well does it solve the problem?’
User testing comes first and this happens as soon as we have an MVP. Usability testing happens once the core product has been validated and it’s time to flesh out the wider scope of functionality that the app or website is supposed to offer. To summarise:
- User testing = user needs
- Usability testing = usability/UX
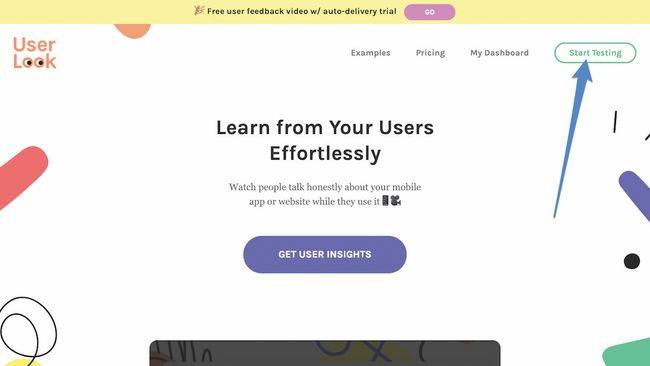
01. Set up UserLook
Start by signing up to UserLook, then choose:
- Start testing
- Self-service w/my own users
Some of the form fields are fairly self-explanatory (for example Name of Test) but we’ll run through some of the less-obvious options that can impact the outcome of our tests.
02. Choose the URL of the website to test
Obvious? Actually not so much! While you might think to add a live website URL here, we can actually include prototypes built with InVision Studio, Adobe XD, Sketch and basically any screen design tool that syncs mockups to the cloud – which means we can test sooner (ie before investing valuable money, time and resources getting into the various complexities of development).To make this work, simply sync your design to Sketch Cloud, InVision or whatever the equivalent is in your design tool of choice, then paste the given share link into the form field.
03. Set a time limit
Was it immediately clear what the webpage was about? If the answer is no, then the user is likely to hit the back button. A five-second user test can determine whether or not the screen or webpage clearly communicates what the user needs to do.
04. Compensate users
While only optional, some level of compensation will create an incentive for users to offer quality feedback. Compensation doesn’t have to mean financial compensation though, it can be something as simple as free access to whatever you’re building.05. Consider your questions carefully
Naturally, the questions themselves are the most defining aspect of the test. The truth is you probably have lots of questions but it’s important to remember that we can conduct as many user tests as needed, so before each test, have a long and hard think about what you want to learn in each one.For instance, an initial free exploration test might reveal that users have trouble signing up, so after designing another iteration one of the questions in a follow-up performance test could be: ‘What frustrations did you have signing up?’
06. Create a context intro
A context intro is the first thing users see when they start their test – this is where we introduce ourselves, explain what we’re doing (and why) and set expectations. If the user is required to complete a specific task, this is where we’d introduce that task and state that there are a few questions to be answered (these will appear in the sidebar during the test process).07. Set participant info requirements
Participant info includes name, email, age, occupation, location, household income, and gender. If we wanted to see how different types of recurring feedback correlate with different demographics, we could segment this data to contribute to what are called user personas, a sort of written story that describes a certain user type as well as their needs and objectives.For example, 18- to 29-year-olds and 48- to 59-year-olds will naturally have different needs and objectives when using, say, Facebook – where younger users might want to engage with brands and older demographics might want to stay in touch with friends. Although optional, this data can offer more context to the user feedback and contribute to the development of these personas.
08. Share test
After defining the scope, we should receive a URL that we can share with user testers. After that, users can complete tests in their own time, leaving us free to work on something else.If the test questions have been defined correctly, we should have some high-quality feedback that’s both actionable and consistent; this means it’s clear what we need to change in the next iteration, with some feedback recurring more than others.
Next, it’s simply a case of organizing the feedback.
09. Organize your data
Affinity mapping is a grouping technique used to organize various data, including insights, ideas, sketches, feedback and snippets of research; in this scenario we could organize our user feedback based on common themes.
If we were user testing, for example, these common themes could help us create what’s called a product roadmap, essentially a timeline of features and fixes focusing primarily on commonly occurring feedback while making less common feedback a secondary concern.
After implementing all of these high-priority improvements, features and fixes from the current sprint cycle, another round of user testing could then reveal a fresh collection of opportunities for improvement, laying the foundation for the next sprint cycle (which, by the way, could also include some or all of the low-priority tasks from the previous sprint). Then just rinse and repeat: always be testing!
After implementing all of these high-priority improvements, features and fixes from the current sprint cycle, another round of user testing could then reveal a fresh collection of opportunities for improvement, laying the foundation for the next sprint cycle (which, by the way, could also include some or all of the low-priority tasks from the previous sprint). Then just rinse and repeat: always be testing!


No comments:
Post a Comment